Measurement is knowledge. It is the basis for all decisions.
Lord Kelvin said over a hundred years ago:
"I often say that when you can measure what you are speaking about and express it in numbers, you know something about it; but when you cannot measure it, when you cannot express it in numbers, your knowledge is of a meagre and unsatisfactory kind..."
The quality of the products you ship to the customers is limited to how close the readings can get to the 'true value' of the characteristic being measured.
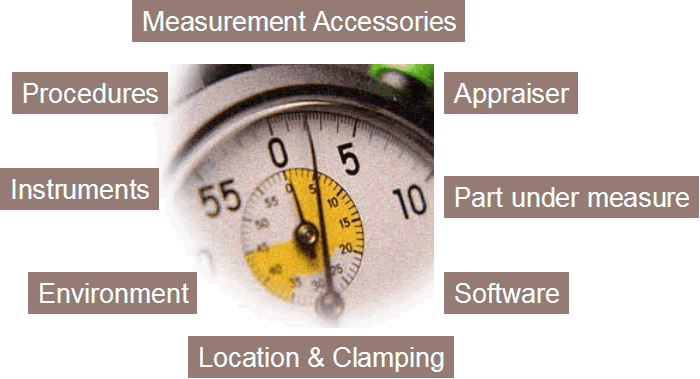
Measurement Systems are much more than the measuring instruments and Gages that you use for measuring. The measurement value that you see is a result of the measurement process carried out by:
- The Measuring instrument
- The person using the measuring instrument (Appraiser)
- The Environment under which the reading has been obtained
- The Methods used set-up and measure the parts
- The tooling and fixture that locates and orients the object under measurement
- The software that performs intermediate calculations and outputs the result
The reading that you obtain is influenced by each one of the above. The extent to which each of the above parameters affect the reading may vary from one situation to another. However, each one of these influencers can be looked at as factors introducing a variation in the process of measurement.

Measurement as a Process
Statistical Process Control has taught us to look at and evaluate the variation in processes. More the complexity of the processes more is the potential variation. Sequenced processes induce variation at every stage. What you get at the output end is the stacked up variation that is a resultant of variation at every step.
Measurement is a process of evaluating an unknown quantity and expressing it into numbers. The Measurement Process too is subject to all the laws of variation and Statistical Process Control.
Measurement Systems Analysis is the scientific and statistical Analysis of Variation that is induced into the process of measurement.
Measurement Systems Analysis has been attempted and done in many Quality initiatives in the past. It gained wider recognition when it was formally defined as one of the key requirements in the QS 9000 Quality Standard, and when it was recognized as an important technique in Six Sigma initiatives.
The use of MSA is still largely restricted to QS 9000/ TS 16949 Quality Standard practitioners, and Six Sigma projects. Would it imply that MSA has little role to play outside these domains? MSA is still looked upon as an inevitable evil that goes with the QS 9000/ TS 16949 certification, or considered a technique that is reserved only for the Six Sigma belts. What implication does MSA have on the quality that you ship to your customers? Let us try to find out.
Why MSA?
A measurement system tells you in numerical terms, an important information about the entity that you measure. How sure can you be about the data that the measurement system delivers? Is it the real value of the measure that you obtain out of the measurement process, or is it the measurement system error that you see? Indeed, measurement systems errors can be expensive, and can fog your capability to obtain the true value of what you measure. It is often said that you can be confident about your reading of a parameter only to the extent that your measurement system can allow.
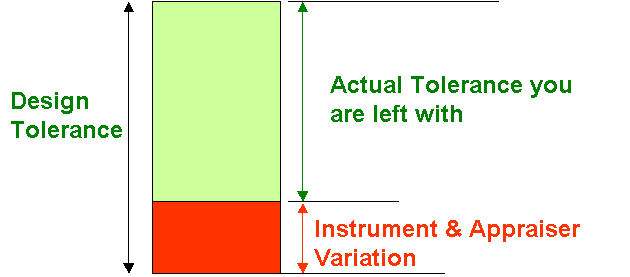
To cite a simple example, a process that you work on may offer you a total tolerance (allowable variation at the output) to an extent of 100 microns). The measurement system that you use to measure this process, however, may have an inherent variation (error) of 40 microns. This means that you are left with only 60 microns as your process tolerance. The measurement system variation eats into your process tolerance.

To be confident about what your process delivers, it is important to analyze and contain the measurement system variation using the scientific technique of Measurement Systems Analysis.
In absence of measurement systems analysis it is common to find, that a product certified as acceptable at the supplier's end is found rejected at the customer's end. Variations do also affect decisions across two sets of evaluations in the same organizations.
How does MSA differ from calibration?
It is a standard practice to periodically calibrate all gages and measuring instruments used in measurement on the shop floor. What is the need of doing MSA once the measuring instruments are calibrated and certified by the calibrating agency?
In simple terms, Calibration is a process of matching up the measuring instrument scale against standards of known value, and correcting the difference, if any. Calibration is done under controlled environment and by specially trained personnel.
On the shop floor, where these instruments are used, the measurement process is affected by all the factors listed earlier. Factors like method of measurement, appraiser's influence, environment, and method of locating the work piece do induce variation in the measured value. It is imperative to assess, measure and document all the factors affecting the measurement process, and try to minimize their effect on the measurement.
Resolving the total Measurement System Variation into its causes
The total measurement system variation has to be resolved into components or causes of variation. Each of these components has to be isolated and quantified. Only then, can one start looking for means of reducing the contribution of each one of these error components.
MSA classifies the variation into:
- Bias:
- Bias is the statistically significant, and systematic (systemic) shift of the reading from its true master value. Bias is usually attributed either to an instrument error, that adds (or subtracts) a constant value to each reading. This can be due to a worn out instrument or a parallax like error in the appraiser's evaluating the reading.
- Repeatability & Reproducibility (R&R):
- Repeatability error is the inherent random variation in the instrument. Reproducibility is the error induced by the influence of the appraiser. R&R errors are usually addressed by providing fixtures for a uniform means of handling the work piece during the measurement process, and standardizing the methods of measurement by training the appraisers. Variations induced by environmental effects are also classified under reproducibility. It is important to make the measurement system robust to all the environmental variations that can normally occur during the course of measurement.
- Linearity:
- Measuring instruments are often used at various nominal dimensions along their scales. Linearity evaluates whether the bias is uniform across the operating range of the measurement system.
- Stability:
- Stability study statistically monitors the state of the measurement system over a period of time. A measurement system will induce more variations in the readings due to wear and tear as it gets into use. Each measurement system will go out of stability after different intervals based on their usage. Rather than fixed period schedules, Stability test can be an excellent guideline to signal when a measurement system should be taken up for calibration. Using Stability Study to determine the calibration frequency can lead to bottom-line savings for your organization. Stability Test scientifically assures you of the predictability of the measurement system behavior over an extended time period.
Attribute Gages (pass/fail, GO/ NO-GO types) also are evaluated for Bias and R&R using the scientific principles of MSA. Cross Tabulation Method, Signal Detection Method and Plotting the Gage performance curves are recommended methods for Attribute Gage MSA.
Once each source of error is carefully evaluated, a clear idea of which one of them is inducing excess variation can be obtained. The course of action to minimize these errors can then be scientifically charted out. It could be an action on the measuring instrument, or standardizing the methods. Need of training is clearly highlighted by evaluation of appraiser to appraiser variation.
The quality of a product that you ship to your esteemed customer can only be as good as the measurement systems that go into measuring it.
Application Orientation, Evaluation of Risks and Opportunities for Improvement through MSA
The purpose of a measurement system is to distinguish one part from another. MSA evaluates if a measurement system is suitable for a specific application. The inherent variability of the measurement system when used to measure your process is compared with the process variation. This comparison tells you how much of the actual part-to-part variation is reported and how much of it is overshadowed by the measurement system's own variation.
MSA helps reduce both the type of risks associated with measurement of a process and making decisions, the risk of False Alarm and the risk of Missed Opportunities.
A measurement system having excess variation may end up rejecting a work piece or a batch that is in fact good. On the other hand, the same excess variation may fail to detect a work piece that is bad or a process that produces out-of-specification work. A measurement system incapable of detecting process variation can never be trusted to make a decision on process adjustment. Even in cases where the process is centered, the measurement system variation will not be able to establish this fact effectively, and may lead to an over-adjustment and unnecessary tweaking of the process.
Unless the measurement system can detect process shifts, special causes can never be identified. If it is excessive appraiser variation, training needs for the appraiser are identified. If there is a problem with Bias or Linearity, the existing calibration procedure needs to be re-examined. The opportunities of improvement are just not available to you if you cannot measure confidently.
MSA is useful not only to audit existing measurement systems, but also to select the most appropriate ones for a new measurement task.
An anonymous quality thinker could not have been more right when he said, "You can't inspect quality into a product."
Performing MSA and looking at the measurement systems with your eyes open, drives your organization from the 'inspection' mentality towards the 'process assurance' mentality.
MSA: A daunting task?
MSA is perceived to be a daunting task due to the involved statistical calculations that go with it. This is especially augmented by the fact that it has to be done for a large number of measurement systems. Much too often, I have come across questions from harrowed quality managers, as to whether they should run a factory to produce saleable products, or should they run an MSA factory?
The issue of study overload can be resolved by carefully scheduling the studies. The involved statistical calculations should be left to a computer running able MSA software. The process owner is then free to carefully analyze the results of MSA and plan a corrective action where required.
Is MSA a MUST DO?
A lot of discussion revolves around whether the Quality Standard mandates MSA, and if it does, to what extent does it do so? Interpretations on 'shall' clauses and 'should' notes are aplenty.
Whether you are Quality certified, or otherwise, all the speculation and interpretations can be put to rest by answering a simple question:
What kind of risk is your customer willing to accept about the quality of the product that you ship him? Is it as large as your measurement system variation?
After all its not so much of getting certified, but it is producing Quality that is going to enable you survive and move ahead in the market.
References:
- Measurement Systems Analysis: AIAG reference Manual, Third Edition
- Statistical Quality Control by Eugene Grant
Author: Ravindra Khare
Symphony Technologies Pvt. Ltd.,
B-4, Saket, Vidnyan Nagar, Bawdhan,
Pune 411 021, INDIA
Published: June 2003
|
Ravindra Khare is a Founder and Director of Symphony Technologies.
He is a qualified Mechanical and Industrial Engineer and a keen student of
Quality & Productivity Technology for the past 18 years.
He can be contacted at e-mail address: ravi@symphonytech.com
or through us at info@symphonytech.com
|

 Top
Top